CKB:File pre-processing errors with ClamAV: Unterschied zwischen den Versionen
(Imported from text file) |
(→Solutions:: Added --fdpass) |
||
| (7 dazwischenliegende Versionen von 2 Benutzern werden nicht angezeigt) | |||
| Zeile 1: | Zeile 1: | ||
== Applies to: == | == Applies to: == | ||
{{NoteBox|title=|content=All Cryptshare | {{NoteBox|title=|content=All Linux-based Cryptshare Servers | ||
}} | }} | ||
== Symptoms: == | |||
== | Several users report that after the file upload has finished, the following message is shown: | ||
[[File:48136607.png]] | |||
The following warnings may be shown in the logs: | The following warnings may be shown in the logs: | ||
WARN yyyy-mm-dd hh:MM:SS FileProcessorService - ERROR: Could not connect to clamd on 127.0.0.1: Connection refused | WARN yyyy-mm-dd hh:MM:SS FileProcessorService - ERROR: Could not connect to clamd on 127.0.0.1: Connection refused | ||
WARN yyyy-mm-dd hh:MM:SS FileProcessorService - ERROR: Could not connect to clamd on LocalSocket /var/run/clamav/clamd-socket: No such file or directory | WARN yyyy-mm-dd hh:MM:SS FileProcessorService - ERROR: Could not connect to clamd on LocalSocket /var/run/clamav/clamd-socket: No such file or directory | ||
=== | == Cause: == | ||
This behaviour may be caused by an unresponsive ClamAV daemon which fails to process incoming files. This leads to all files of all transfers with pre-processing enabled being rejected. | |||
== Solutions: == | |||
=== Check if minimum system requirements are met === | |||
Please check if your Cryptshare Server host system meets the following requirements, especially the amount of memory. Too few available memory is a well-known cause of ClamAV crashes. | |||
* For Cryptshare Appliances: See [https://documentation.cryptshare.com/w/CSSCurrent_en:Requirements_for_Appliances this section for details]. | |||
* For other Linux-based installations: See [https://documentation.cryptshare.com/w/CSSCurrent_en:Requirements_for_Self_Installed_Systems this section for details]. | |||
{{NoteBox|title=|content=In addition, please make sure that an appropriate amount of swap space is available, to cover peak memory loads. See the documentation of your Linux distribution for more details, e.g. for Ubuntu: https://help.ubuntu.com/community/SwapFaq or OpenSUSE: https://en.opensuse.org/SDB:Partitioning#The_swap_partition_type}} | |||
== | === Check if your distribution is up-to-date === | ||
ClamAV | Usually, the ClamAV packages are updated together with the Linux distribution. Please check if all your packages are up-to-date. | ||
'''Cryptshare Appliance:''' | |||
== | # Login to the Cryptshare Administration Interface. | ||
# Open "Operating System" in the main menu. | |||
# Check if a distribution upgrade is provided there. | |||
## If yes, perform the distribution upgrade using the Administration Interface. See [https://documentation.cryptshare.com/w/CSSCurrent_en:Operating_System_Upgrade this section for details]. | |||
## If not, proceed with the following steps. | |||
# Connect to your Cryptshare Appliance via SSH (as '''root'''). | |||
# Execute the following command: | |||
#: <code>zypper update -y</code> | |||
# Proceed with solution "Restart ClamAV service" to assert that ClamAV is running correctly. | |||
'''Other Linux distributions:''' | |||
The actual update process depends on your Linux distribution. For example, on Debian/Ubuntu: | |||
# Connect to your server via SSH. | |||
# Execute the following commands: | |||
#: <code>sudo apt update</code> | |||
#: <code>sudo apt upgrade -y</code> | |||
# Proceed with solution "Restart ClamAV service" to assert that ClamAV is running correctly. | |||
=== Restart ClamAV service === | |||
{{NoteBox|title=|content=The following commands assume that your Linux distribution uses "systemd", like Debian, Ubuntu or openSUSE (Cryptshare Appliances). Furthermore, it is assumed that the service is called '''"clamd"''' - in some distributions this is '''"clamav-daemon"''' instead.}} | |||
First, check if the service is enabled. This keeps it started accross system reboots: | |||
# Connect to your server via SSH. | |||
# Execute the following commands: | |||
# <code>systemctl status clamd</code> | |||
#: This should result in an output like this: | |||
#: [[File:Clamav-status.png]] | |||
# If the output shows a "disabled" status instead, issue the following command: | |||
#: <code>systemctl enable clamd</code> | |||
Next, restart the ClamAV deamon: | |||
# Execute the following command: | |||
#: <code>systemctl restart clamd</code> | |||
#: (This may take some seconds) | |||
# If the command succeeded (no output), check the status of the service with: | |||
#: <code>systemctl status clamd</code> | |||
If the ClamAV service failed to start, check the following sections. | |||
=== | ====ClamAV failed to start with "Can't connect to clamd through /var/run/clamav/clamd-socket: No such file or directory"==== | ||
This may occur if the ClamAV virus definitions were not updated successfully during an automatic update. Follow these steps to repair the definitions: | |||
# Connect to your server via SSH. | |||
# Execute the following commands: | |||
#:<code>systemctl stop clamd</code> | |||
#:<code>rm /var/lib/clamav/daily.*</code> | |||
#:<code>rm /var/lib/clamav/main.*</code> | |||
#:<code>freshclam</code> | |||
#:<code>systemctl start clamd</code> | |||
# Check the ClamAV service status: | |||
#:<code>systemctl status clamd</code> | |||
''' | ====ClamAV failed to start with "Job for clamd.service failed because a timeout was exceeded."==== | ||
This occurs if the clamd service runs into a timeout while starting. Follow these steps to increase the timeout to 900 seconds: | |||
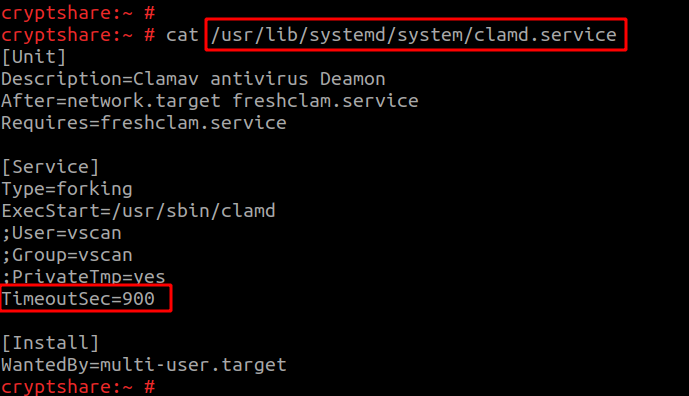
# Insert the line '''TimeoutSec=900''' in the File '''/usr/lib/systemd/system/clamd.service''' beneath the [Service] tag: | |||
#: [[File:51970799.png]] | |||
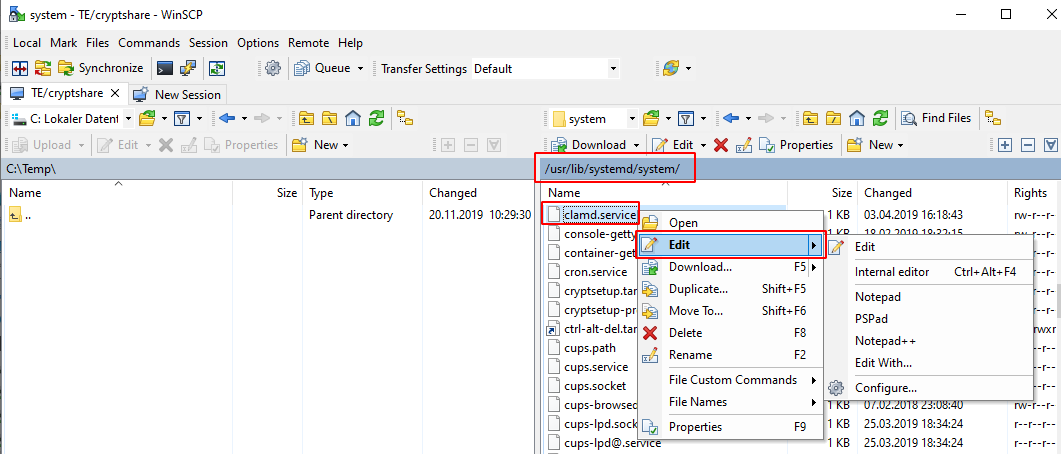
#: WinSCP can also be used to edit the file: ([https://winscp.net/eng/download.php https://winscp.net/eng/download.php]) | |||
#: [[File:51970805.png]] | |||
# Execute the following commands: | |||
#: <code>systemctl daemon-reload</code> | |||
#: <code>systemctl start clamd</code> | |||
= | === In Case The Issue Persists === | ||
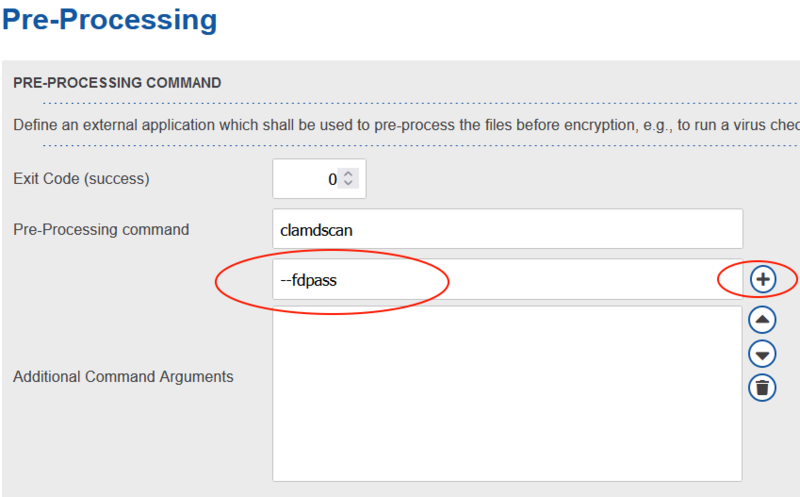
The | In case the issue persists we can try adding the --fdpass flag to ClamAV within the Cryptshare. For this navigate to "Transfer Processing" -> "Pre-Processing". Here add the flag within the third input field and then click the "+" button on the right side. Then save changes. '''Please repeat these steps for any policies in use.''' | ||
[[Datei:ClamAV set --fdpass.png|rahmenlos|800x800px]] | |||
[[ | |||
Aktuelle Version vom 15. Dezember 2023, 11:14 Uhr
Applies to:
Symptoms:
Several users report that after the file upload has finished, the following message is shown:
The following warnings may be shown in the logs:
WARN  yyyy-mm-dd hh:MM:SS FileProcessorService - ERROR: Could not connect to clamd on 127.0.0.1: Connection refused

WARN  yyyy-mm-dd hh:MM:SS FileProcessorService - ERROR: Could not connect to clamd on LocalSocket /var/run/clamav/clamd-socket: No such file or directory
Cause:
This behaviour may be caused by an unresponsive ClamAV daemon which fails to process incoming files. This leads to all files of all transfers with pre-processing enabled being rejected.
Solutions:
Check if minimum system requirements are met
Please check if your Cryptshare Server host system meets the following requirements, especially the amount of memory. Too few available memory is a well-known cause of ClamAV crashes.
- For Cryptshare Appliances: See this section for details.
- For other Linux-based installations: See this section for details.
Check if your distribution is up-to-date
Usually, the ClamAV packages are updated together with the Linux distribution. Please check if all your packages are up-to-date.
Cryptshare Appliance:
- Login to the Cryptshare Administration Interface.
- Open "Operating System" in the main menu.
- Check if a distribution upgrade is provided there.
- If yes, perform the distribution upgrade using the Administration Interface. See this section for details.
- If not, proceed with the following steps.
- Connect to your Cryptshare Appliance via SSH (as root).
- Execute the following command:
zypper update -y
- Proceed with solution "Restart ClamAV service" to assert that ClamAV is running correctly.
Other Linux distributions:
The actual update process depends on your Linux distribution. For example, on Debian/Ubuntu:
- Connect to your server via SSH.
- Execute the following commands:
sudo apt updatesudo apt upgrade -y
- Proceed with solution "Restart ClamAV service" to assert that ClamAV is running correctly.
Restart ClamAV service
First, check if the service is enabled. This keeps it started accross system reboots:
- Connect to your server via SSH.
- Execute the following commands:
systemctl status clamd- If the output shows a "disabled" status instead, issue the following command:
systemctl enable clamd
Next, restart the ClamAV deamon:
- Execute the following command:
systemctl restart clamd- (This may take some seconds)
- If the command succeeded (no output), check the status of the service with:
systemctl status clamd
If the ClamAV service failed to start, check the following sections.
ClamAV failed to start with "Can't connect to clamd through /var/run/clamav/clamd-socket: No such file or directory"
This may occur if the ClamAV virus definitions were not updated successfully during an automatic update. Follow these steps to repair the definitions:
- Connect to your server via SSH.
- Execute the following commands:
systemctl stop clamdrm /var/lib/clamav/daily.*rm /var/lib/clamav/main.*freshclamsystemctl start clamd
- Check the ClamAV service status:
systemctl status clamd
ClamAV failed to start with "Job for clamd.service failed because a timeout was exceeded."
This occurs if the clamd service runs into a timeout while starting. Follow these steps to increase the timeout to 900 seconds:
- Insert the line TimeoutSec=900 in the File /usr/lib/systemd/system/clamd.service beneath the [Service] tag:

- WinSCP can also be used to edit the file: (https://winscp.net/eng/download.php)

- Execute the following commands:
systemctl daemon-reloadsystemctl start clamd
In Case The Issue Persists
In case the issue persists we can try adding the --fdpass flag to ClamAV within the Cryptshare. For this navigate to "Transfer Processing" -> "Pre-Processing". Here add the flag within the third input field and then click the "+" button on the right side. Then save changes. Please repeat these steps for any policies in use.


