CKB:Appliance is not available after upgrading to openSUSE 13.2: Unterschied zwischen den Versionen
(Imported from text file) |
Keine Bearbeitungszusammenfassung |
||
| Zeile 13: | Zeile 13: | ||
== Solution: == | == Solution: == | ||
=== Step 1. Write down IP addresses === | === Step 1. Write down IP addresses === | ||
1. login as 'root' on the appliance | |||
2. run the command 'yast network' | |||
3. select F10 Launch | |||
4. select F4 Edit | |||
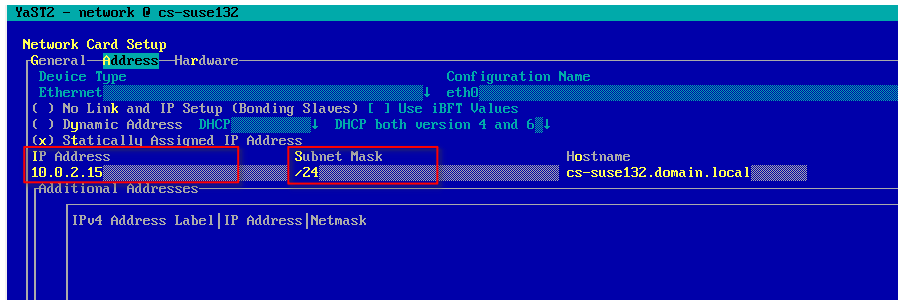
5. write down the '''IP and Subnet Mask''' | |||
[[File:7667733.png]] | [[File:7667733.png]] | ||
6. select F9 Cancel | |||
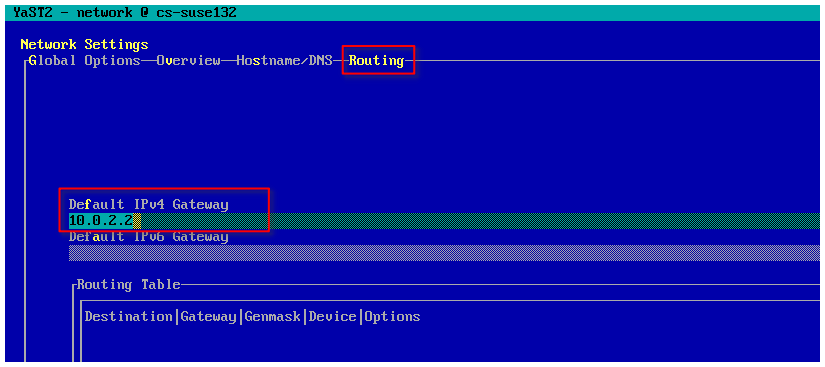
7. select 'Routing' using the tab key and write down the '''default IPv4 Gateway address''' | |||
[[File:7667734.png]] | [[File:7667734.png]] | ||
=== Step 2. Configure dynamic IP address === | === Step 2. Configure dynamic IP address === | ||
1. go to the tab Overview again | |||
2. select F4 Edit | |||
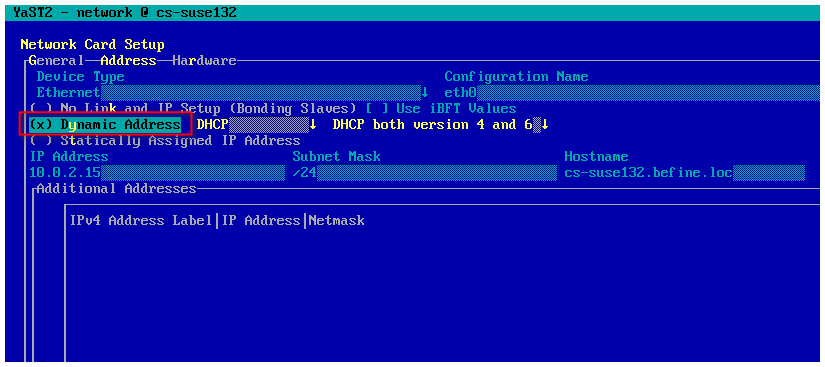
3. go to '''Dynamic Address''' and '''select it''' using blank space key | |||
[[File:7667735.png]] | [[File:7667735.png]] | ||
4. select F10 Next | |||
'''5. save''' the configuration by selecting '''F10''' OK | |||
=== Step 3. Configure the static IP address === | === Step 3. Configure the static IP address === | ||
1. run the command 'yast network' again | |||
2. select F10 Launch | |||
3. select F4 Edit | |||
4. select '''Statically Assigned IP Address''' | |||
5. type the '''IP address and the Subnet Mask''' wrote down in '''step 1''' | |||
[[File:7667736.png]] | [[File:7667736.png]] | ||
6. select F10 Next | |||
7. go to the '''tab Routing''' and enter the '''default IPv4 Gateway address''' wrote down in '''step 1''' | |||
[[File:7667737.png]] | [[File:7667737.png]] | ||
'''8. save''' the configuration by selecting '''F10''' OK | |||
=== Step 4. Check the settings === | === Step 4. Check the settings === | ||
# run the command ''''route'''' | #run the command '<nowiki/>'''route'''' | ||
# the corresponding route will be shown and the appliance is available again | # the corresponding route will be shown and the appliance is available again | ||
[[File:7667738.png]] | [[File:7667738.png]] | ||
----- | ----- | ||
Aktuelle Version vom 14. Januar 2022, 14:34 Uhr
Applies to:
Symptom:
After updating the Operating System of the Cryptshare Appliance from openSUSE 13.1 to 13.2 the Server cannot be reached via the network any longer.
Cause:
The appropriate network route is not properly setup.
Solution:
Step 1. Write down IP addresses
1. login as 'root' on the appliance
2. run the command 'yast network'
3. select F10 Launch
4. select F4 Edit
5. write down the IP and Subnet Mask

6. select F9 Cancel
7. select 'Routing' using the tab key and write down the default IPv4 Gateway address

Step 2. Configure dynamic IP address
1. go to the tab Overview again
2. select F4 Edit
3. go to Dynamic Address and select it using blank space key

4. select F10 Next
5. save the configuration by selecting F10 OK
Step 3. Configure the static IP address
1. run the command 'yast network' again
2. select F10 Launch
3. select F4 Edit
4. select Statically Assigned IP Address
5. type the IP address and the Subnet Mask wrote down in step 1

6. select F10 Next
7. go to the tab Routing and enter the default IPv4 Gateway address wrote down in step 1

8. save the configuration by selecting F10 OK
Step 4. Check the settings
- run the command 'route'
- the corresponding route will be shown and the appliance is available again
