CKB:Setting up Management Interface (IPMI): Unterschied zwischen den Versionen
K (Move page script verschob die Seite CKB:45515283 nach CKB:Setting up Management Interface (IPMI)) |
Keine Bearbeitungszusammenfassung |
||
| Zeile 13: | Zeile 13: | ||
== Solution: == | == Solution: == | ||
1. first a connection via the '''IPMI interface with a network cable''' must be set up | |||
[[File:45515683.png]] | [[File:45515683.png]] | ||
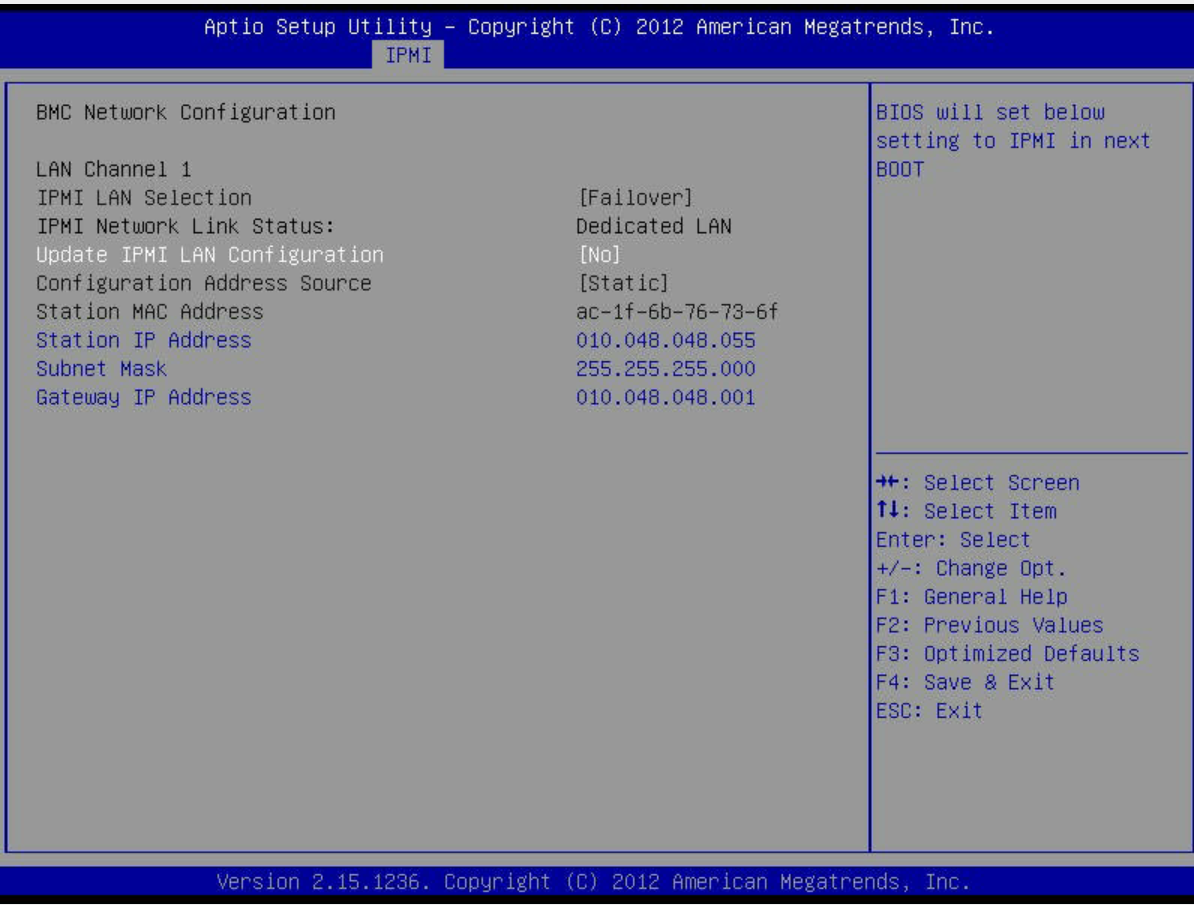
2. boot into '''BIOS''' and navigate to '''IPMI tab''' | 2. boot into '''BIOS''' and navigate to '''IPMI tab''' | ||
'''[[File:45515684.png]]''' | '''[[File:45515684.png]]''' | ||
3. select '''yes''' at '''Update IPMI LAN Configuration''' and enter a '''static''' IP address or select '''DHCP'''. | 3. select '''yes''' at '''Update IPMI LAN Configuration''' and enter a '''static''' IP address or select '''DHCP'''. | ||
{{WarnBox|title=|content=For security reasons, this IP address must not be openly accessible from the Internet. | {{WarnBox|title=|content=For security reasons, this IP address must not be openly accessible from the Internet. | ||
}} | }} | ||
'''Save changes and restart''' after set up network configuration. | '''4. Save changes and restart''' after set up network configuration. | ||
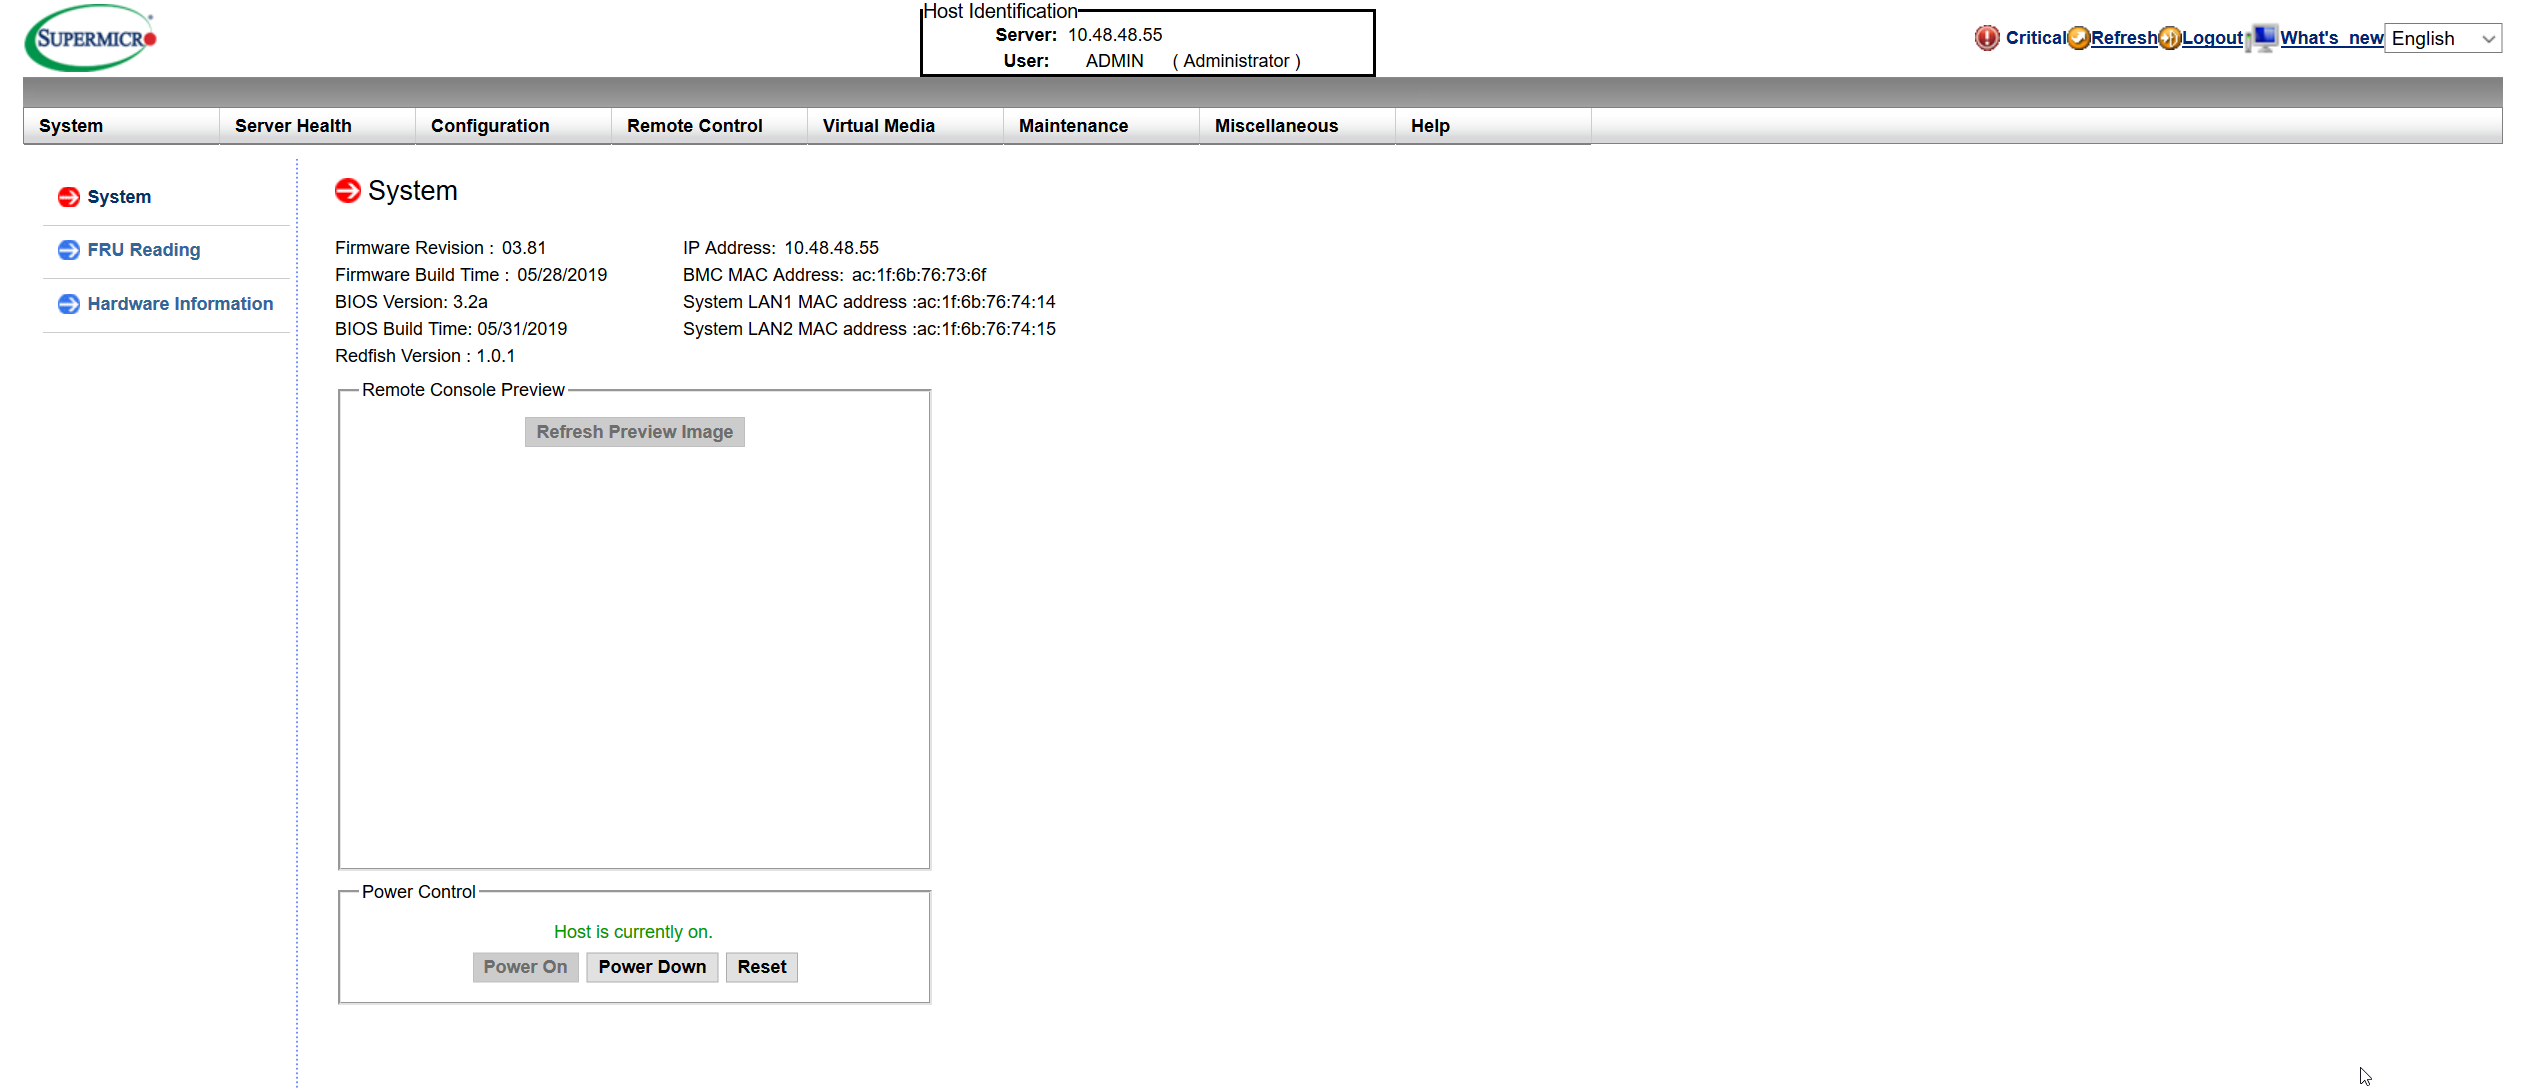
4. now you can connect via '''browser''' to the set up IP address | 4. now you can connect via '''browser''' to the set up IP address | ||
[[File:45515685.png]] | [[File:45515685.png]] | ||
The default log in credentials are ADMIN / ADMIN | The default log in credentials are ADMIN / ADMIN | ||
5. once you are logged in you can '''check''' the '''hardware information''' of your system, the '''server health''', an '''event log''' and have '''remote control''' of the system | 5. once you are logged in you can '''check''' the '''hardware information''' of your system, the '''server health''', an '''event log''' and have '''remote control''' of the system | ||
[[File:45515686.png]] | [[File:45515686.png]] | ||
=== Mounting virtual media === | === Mounting virtual media === | ||
| Zeile 32: | Zeile 38: | ||
On IPMI web interface select '''Remote Control''' → '''Console Redirection''' → '''Launch Console'''. | On IPMI web interface select '''Remote Control''' → '''Console Redirection''' → '''Launch Console'''. | ||
[[File:65671626.png]] | [[File:65671626.png]] | ||
Depending on settings on your system the console will be opened immediately or '''launch.jnlp''' file will be downloaded. To run this file use '''javaws''' (by Oracle Java) or '''IcedTea-Web''' tool (by AdoptOpenJDK). | Depending on settings on your system the console will be opened immediately or '''launch.jnlp''' file will be downloaded. To run this file use '''javaws''' (by Oracle Java) or '''IcedTea-Web''' tool (by AdoptOpenJDK). | ||
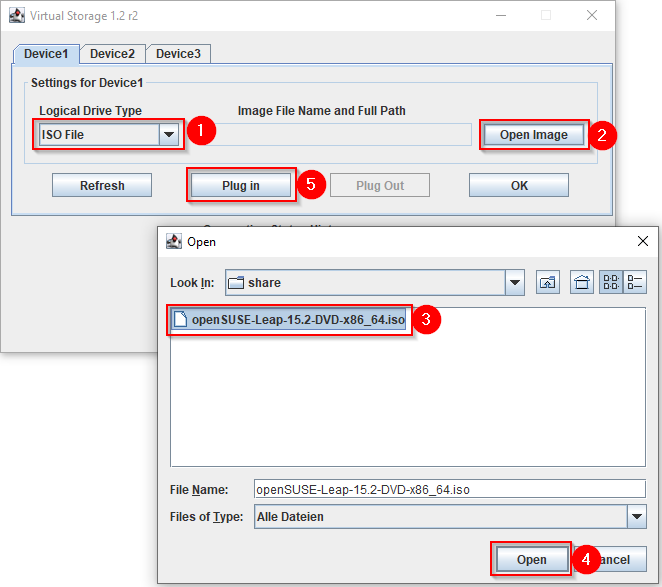
In the console navigate to '''Virtual Media → Virtual Storage''' and select your '''ISO File → Open Image → Open → Plug in''' | In the console navigate to '''Virtual Media → Virtual Storage''' and select your '''ISO File → Open Image → Open → Plug in''' | ||
[[File:65671627.png]] | [[File:65671627.png]] | ||
[[File:65671629.png]] | [[File:65671629.png]] | ||
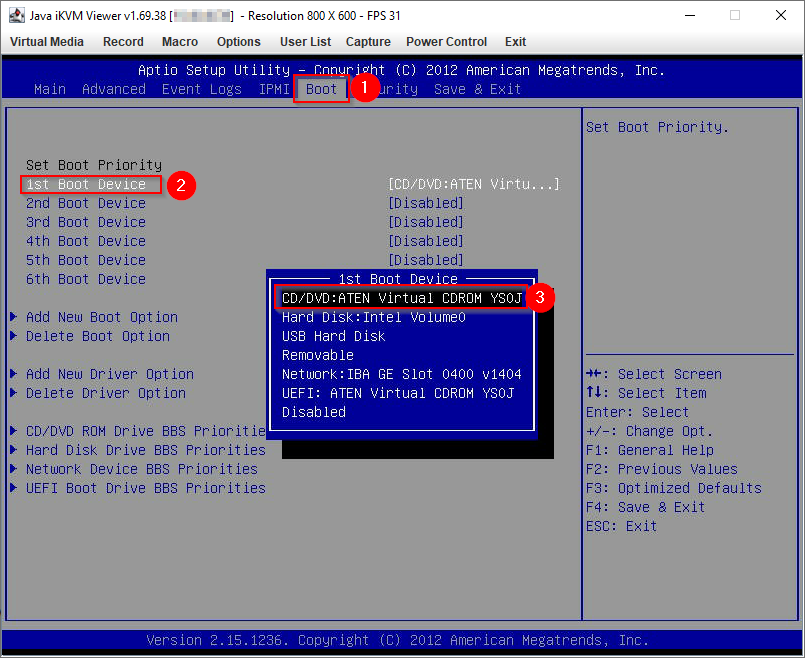
Power on or restart your server, open BIOS settings, navigate to '''Boot''', activate virtual '''CD/DVD''' and restart the device on pressing '''F4''' or using '''Save Changes and Reset''' in Save & Exit menu. | Power on or restart your server, open BIOS settings, navigate to '''Boot''', activate virtual '''CD/DVD''' and restart the device on pressing '''F4''' or using '''Save Changes and Reset''' in Save & Exit menu. | ||
[[File:65671630.png]] | [[File:65671630.png]] | ||
Aktuelle Version vom 14. Januar 2022, 12:46 Uhr
Applies to:
Purpose:
This article describes how to establish a IPMI connection to your Cryptshare Hardware Appliance. If you would like to get further information about IPMI please follow this link.
Solution:
1. first a connection via the IPMI interface with a network cable must be set up
 2. boot into BIOS and navigate to IPMI tab
3. select yes at Update IPMI LAN Configuration and enter a static IP address or select DHCP.
4. Save changes and restart after set up network configuration.
4. now you can connect via browser to the set up IP address
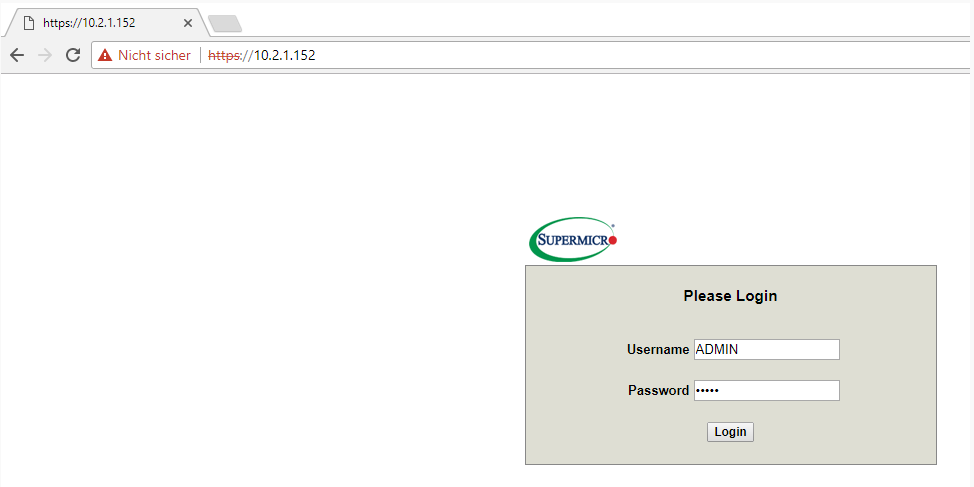
The default log in credentials are ADMIN / ADMIN
5. once you are logged in you can check the hardware information of your system, the server health, an event log and have remote control of the system
Mounting virtual media
On IPMI web interface select Remote Control → Console Redirection → Launch Console.
Depending on settings on your system the console will be opened immediately or launch.jnlp file will be downloaded. To run this file use javaws (by Oracle Java) or IcedTea-Web tool (by AdoptOpenJDK).
In the console navigate to Virtual Media → Virtual Storage and select your ISO File → Open Image → Open → Plug in
Power on or restart your server, open BIOS settings, navigate to Boot, activate virtual CD/DVD and restart the device on pressing F4 or using Save Changes and Reset in Save & Exit menu.
