OWACurrent en:Commissioning: Unterschied zwischen den Versionen
(adding a notebox about the installation process changing) |
(some new screenshots for upload process, needs screenshot for "finished") |
||
| Zeile 18: | Zeile 18: | ||
== Upload the add-in == | == Upload the add-in == | ||
1. Open the administration interface of the Cryptshare Server and navigate to '''Add-on Products → Cryptshare for OWA'''. The opened view will display information about the currently installed add-in, if available, and provides the option to upload the add-in package. | 1. Open the administration interface of the Cryptshare Server and navigate to '''Add-on Products → Cryptshare for OWA'''. The opened view will display information about the currently installed add-in, if available, and provides the option to upload the add-in package. | ||
2. Click on 'Browse...' and select the previously downloaded .zip file. | 2. Click on 'Browse...' and select the previously downloaded .zip file. | ||
[[File: | [[File:FileBrowseDialogue.png]][[File:72319892.png]] | ||
[[File: | 3. Click on 'Upload Add-In' to start the upload process. | ||
[[File:UploadAddinButton.png]] | |||
4. After the add-in has been installed successfully, the view should update with relevant information about the installed add-in version. | 4. After the add-in has been installed successfully, the view should update with relevant information about the installed add-in version. | ||
Version vom 25. Januar 2024, 17:28 Uhr
You may obtain the latest version of Cryptshare for OWA in the Cryptshare Customer section on the Cryptshare AG homepage.
Overview
To install and use the OWA add-in, the following steps are required:
- Enable SSL / HTTPS on the Cryptshare Server
- Set up Microsoft Graph access on the Azure Webservices
- Upload the add-in to the Cryptshare Server
- Upload CSOW language packs to the Cryptshare Server
- Deploy the provided add-in via Microsoft Exchange Online
First installation steps
Before continuing, make sure that SSL/HTTPS access is enabled on the server.
For setting up Microsoft Graph access to allow the add-in to function correctly, please refer to TODO: LINK HERE.
Upload the add-in
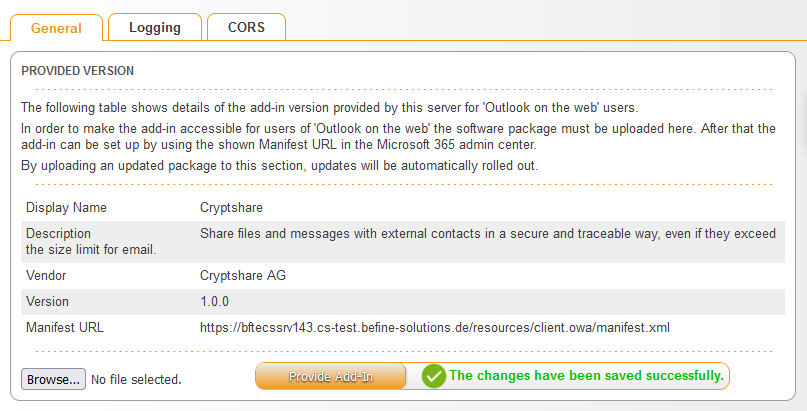
1. Open the administration interface of the Cryptshare Server and navigate to Add-on Products → Cryptshare for OWA. The opened view will display information about the currently installed add-in, if available, and provides the option to upload the add-in package.
2. Click on 'Browse...' and select the previously downloaded .zip file.
3. Click on 'Upload Add-In' to start the upload process.

4. After the add-in has been installed successfully, the view should update with relevant information about the installed add-in version.
5. Copy the manifest URL to your clipboard (Ctrl+C). You will need this to deploy the add-in once ready.
Upload language packages
Please refer to the Server documentation 'Installing Language Packages' on how to install language packages.
Language packages for the OWA add-in are available 'here..'
Deployment
The Add-in is now provided by the Cryptshare Server at the manifest URL you have copied in the previous steps.
To make it accessible to your users, you will have to deploy the add-in.
You may either deploy it using Microsoft Exchange Online, or deploy it on a single-user basis. The following links will redirect to the knowledgebase articles of Microsoft for the respective setups. Follow the "Custom Apps" sections of these guides.


