OWACurrent en:Setting up MS Graph: Unterschied zwischen den Versionen
Aus Cryptshare Documentation
KKeine Bearbeitungszusammenfassung |
|||
| Zeile 9: | Zeile 9: | ||
# Sign in to the [https://entra.microsoft.com/ Microsoft Entra Admin Center] as an account that is a [https://learn.microsoft.com/en-us/entra/identity/role-based-access-control/permissions-reference#cloud-application-administrator Cloud Application Administrator] or greater. | # Sign in to the [https://entra.microsoft.com/ Microsoft Entra Admin Center] as an account that is a [https://learn.microsoft.com/en-us/entra/identity/role-based-access-control/permissions-reference#cloud-application-administrator Cloud Application Administrator] or greater. | ||
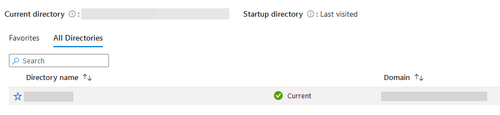
# If you have access to multiple tenants/directories, ensure you've selected the tenant that you wish to use Cryptshare for OWA with by clicking on the Settings cogwheel at the top. [[File:EntraSettings.png|border|none]][[File:CurrentEntraDirectory.png|border|none|500px]] | # If you have access to multiple tenants/directories, ensure you've selected the tenant that you wish to use Cryptshare for OWA with by clicking on the Settings cogwheel at the top. [[File:EntraSettings.png|border|none]][[File:CurrentEntraDirectory.png|border|none|500px]] | ||
# Using the | # Using the sidebar, navigate to '''Identity -> Applications -> App registrations.''' | ||
# Create a new registration by clicking on "New registration". [[File:EntraNewRegistration.png|border|none|500px]] | # Create a new registration by clicking on "New registration". [[File:EntraNewRegistration.png|border|none|500px]] | ||
# Register your app with the following parameters: [[File:EntraRegistering.png|border|none|500px]] | # Register your app with the following parameters: [[File:EntraRegistering.png|border|none|500px]] | ||
Version vom 26. Januar 2024, 17:31 Uhr
Introduction
The add-in utilizes Microsoft Graph to provide some of its functionality. Specifically, the add-in requests access to reading your users mailbox, to provide functionality regarding client verification and retrieving transfers.
Registering an app in the Azure Entra Platform
Exact procedures are subject to change
Microsoft may change the exact process of registering applications without notice. It is recommended to familiarize yourself with the current process of registering an application with the Microsoft Identity Platform.
- Sign in to the Microsoft Entra Admin Center as an account that is a Cloud Application Administrator or greater.
- If you have access to multiple tenants/directories, ensure you've selected the tenant that you wish to use Cryptshare for OWA with by clicking on the Settings cogwheel at the top.

- Using the sidebar, navigate to Identity -> Applications -> App registrations.
- Create a new registration by clicking on "New registration".

- Register your app with the following parameters:
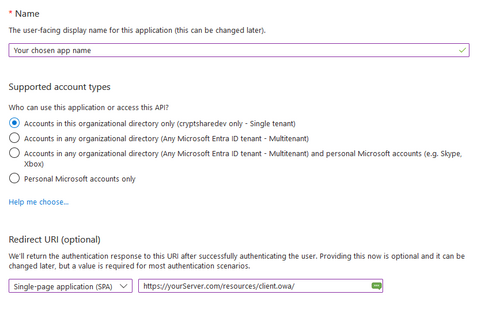
- The application name may be chosen freely.
- You may choose the supported account types according to your requirements. Depending on your selection, you will need additional information found after you've finalized the app registration in order to finalize the set-up on the Cryptshare Server.
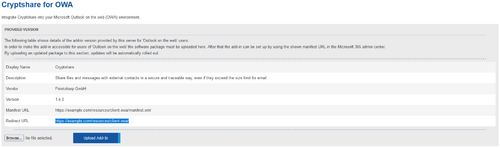
- You must add a redirect URI, configured as a "Single-Page Application (SPA)". The redirect URI must exactly match the one that is displayed on the Add-on products -> Cryptshare for OWA configuration page of your Cryptshare Server.
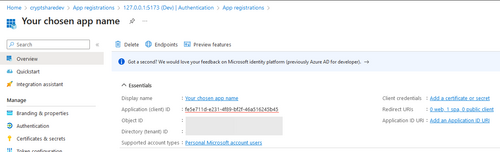
- Once you've created the application, copy/store the "Application (client) ID".
- In the sidebar of the registered application, select "API permissions."
- Click on "Add a permission", in order to add the Microsoft Graph -> Mail.Read permission.
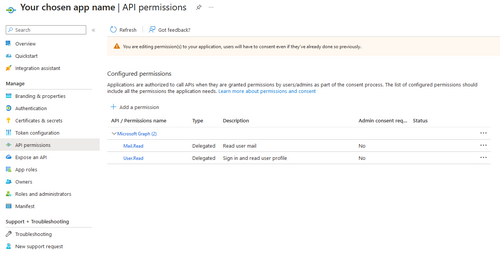
- Ensure that the application you have just created has access to the following delegated permissions: User.Read and Mail.Read.
- Continue with configuring the newly registered app in your Cryptshare Server.


OWA Add-ins use the Microsoft Entra app that is configured within the associated Cryptshare Server.
To get started, open the Add-on products -> Cryptshare for OWA configuration page in the admin interface.

In the Application (client) ID field, enter the application ID you have retrieved from the Entra portal after registering your application.
The authority setting depends on the supported account types you have selected when registering your application on Microsoft Entra.