RESTAPI:File pre-processing errors with ClamAV
Applies to:
Symptoms:
Several users report that after the file upload has finished, the following message is shown:
The following warnings may be shown in the logs:
WARN  yyyy-mm-dd hh:MM:SS FileProcessorService - ERROR: Could not connect to clamd on 127.0.0.1: Connection refused

WARN  yyyy-mm-dd hh:MM:SS FileProcessorService - ERROR: Could not connect to clamd on LocalSocket /var/run/clamav/clamd-socket: No such file or directory
Cause:
This behaviour may be caused by an unresponsive ClamAV daemon which fails to process incoming files. This leads to all files of all transfers with pre-processing enabled being rejected.
Solutions:
Check if minimum system requirements are met
Please check if your Cryptshare Server host system meets the following requirements, especially the amount of memory. Too few available memory is a well-known cause of ClamAV crashes.
- For Cryptshare Appliances: See this section for details.
- For other Linux-based installations: See this section for details.
Check if your distribution is up-to-date
Usually, the ClamAV packages are updated together with the Linux distribution. Please check if all your packages are up-to-date.
Cryptshare Appliance:
- Login to the Cryptshare Administration Interface.
- Open "Operating System" in the main menu.
- Check if a distribution upgrade is provided there.
- If yes, perform the distribution upgrade using the Administration Interface. See this section for details.
- If not, proceed with the following steps.
- Connect to your Cryptshare Appliance via SSH (as root).
- Execute the following command:
zypper update -y
- Proceed with solution "Restart ClamAV service" to assert that ClamAV is running correctly.
Other Linux distributions:
The actual update process depends on your Linux distribution. For example, on Debian/Ubuntu:
- Connect to your server via SSH.
- Execute the following commands:
sudo apt updatesudo apt upgrade -y
- Proceed with solution "Restart ClamAV service" to assert that ClamAV is running correctly.
Restart ClamAV service
First, check if the service is enabled. This keeps it started accross system reboots:
- Connect to your server via SSH.
- Execute the following commands:
systemctl status clamd- If the output shows a "disabled" status instead, issue the following command:
systemctl enable clamd
Next, restart the ClamAV deamon:
- Execute the following command:
systemctl restart clamd- (This may take some seconds)
- If the command succeeded (no output), check the status of the service with:
systemctl status clamd
If the ClamAV service failed to start, check the following sections.
ClamAV failed to start with "Can't connect to clamd through /var/run/clamav/clamd-socket: No such file or directory"
This may occur if the ClamAV virus definitions were not updated successfully during an automatic update. Follow these steps to repair the definitions:
- Connect to your server via SSH.
- Execute the following commands:
systemctl stop clamdrm /var/lib/clamav/daily.*rm /var/lib/clamav/main.*freshclamsystemctl start clamd
- Check the ClamAV service status:
systemctl status clamd
ClamAV failed to start with "Job for clamd.service failed because a timeout was exceeded."
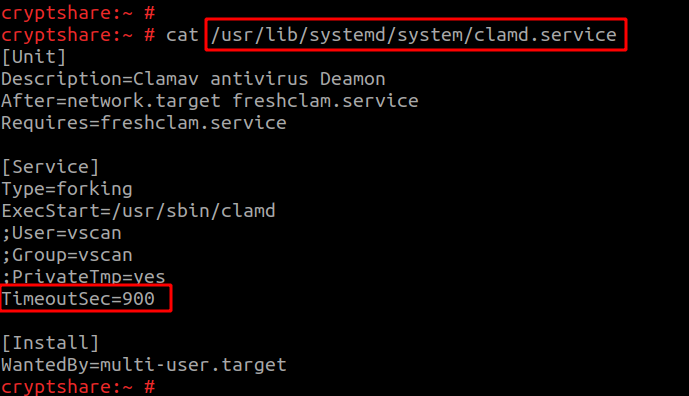
This occurs if the clamd service runs into a timeout while starting. Follow these steps to increase the timeout to 900 seconds:
- Insert the line TimeoutSec=900 in the File /usr/lib/systemd/system/clamd.service beneath the [Service] tag:

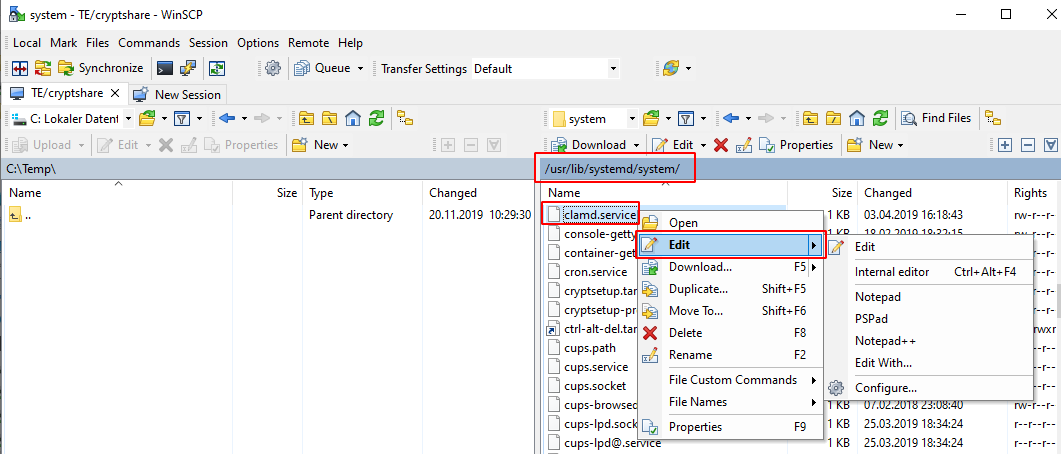
- WinSCP can also be used to edit the file: (https://winscp.net/eng/download.php)

- Execute the following commands:
systemctl daemon-reloadsystemctl start clamd

